Spring Boot notes
文章目录
Tutorials
Rest Web Service
https://www.tutorialspoint.com/spring_boot/spring_boot_building_restful_web_services.htm
Resource Controller
- URL 参数处理
类 @RestController
- Model, View(这里没有), Controller 模型
- 把 URL 路由相关的输入,通过方法,映射到模型 Model 来处理,并返回这 个模型
| |
方法 @RequestMapping
映射路由到方法
| |
方法 @GetMapping
方法名,即路由名
- 方法:对应 URL 路由
- get –> @GetMapping
- put –> @PutMapping –> @RequestMapping(method=GET)
形参 @RequestParam
形参名,即输入参数关键字名
形参:对应 get 命令的参数 "/greeting?name=lily"
- 关联 URL 参数中的关键字
指定默认值
- @RequestParam(value = "name", defaultValue="World")
- 使用 @RequestParam 注解的 defaultValue 属性
是否必须
- @RequestParam(value = "name", required = false, defaultValue = "honey")
- required 参数
形参 @PathVariable
提取路径名
- "/hello/{user}" —> 这里的 user
形参
- @PathVariable("user")
方法返回值
一个 Model 类的实例
- eg: new Greeting(counter.incrementAndGet(), String.format(template, name));
依赖
Starters
依赖名称使用前缀
- spring-boot-starter-*
@RestController
相当于 @Controller + @ResponseBody
@ResponseBody
把返回值换成 response 的 body
作用对象
- 方法
简述
返回值是一个对象
- 转化:Object –> json –> Response
过程
- 用来修饰方法,把@Controller 修饰过的类的方法的返回对象,转化成 json, 再制作一个 HttpResponse, 这个 json 就是 response 的 body
@RequestBody
把形参 绑定到 Request 的 body https://stackoverflow.com/a/34761773
作用对象
方法的形参
- 形参类型
原生类型:String, int
- 直接转换
class 类
- json, key 与 value, 对应转换
1 2 3 4@RequestMapping(path = "/something", method = RequestMethod.PUT) public void handle(@RequestBody String body, Writer writer) throws IOException { writer.write(body); }- 上述例子中 变量 body 就是 Reuqest 的 body 了
@RequestMapping
https://blog.csdn.net/qq_35246620/article/details/59620858 指定 Url 的路径
参数
- value: 指定 URL 路径
method: 请求的方法
- RequestMethod.PUT
- RequestMethod.GET
- …
修饰方法
- 参数: value, 指定当前的路径
修饰类
参数: value, 指定所有方法的父路径
1 2 3 4 5 6 7 8 9// 用于类上,可以没有 @RequestMapping(value = "/controllerDemo") public class ControllerDemo { // 用于方法上,必须有 @RequestMapping(value = "/methodDemo") public String methodDemo() { return "helloWorld"; } }
@PathVariable
与@RequestMapping 一起使用,提取 URL 中的参数
方法中的参数名 <—> URL 中的参数名
- 两者完全一致
| |
@SpringBootApplication
提供三种功能
@EnableAutoConfiguration
- 启用自动化配置功能
@ComponentScan
- 实现 @Component 的扫描 scan
- 扫描当前 package
@Configuration
- 用于允许注册 extra beans (在 context 中)和 导入 additional configuration classes
| |
@Bean
用在 @Configuration 和 @Component 中,
用途
- 用来把方法返回的对象提交给 Spring 管理
- Spring 会把这个 Bean 对象放到 IOC 容器中
修饰对象
方法
- @Configuration 修饰的类中的方法
注意
- 提交 Bean 的方法,Spring 只会调用一次
如果未指定产生的 bean 的名称
- 默认名称为:首字母小写的方法名
- eg: @Bean: 无名称, @Bean("myIceCream"): 指定名称 myIceCream
参数
- name: 指定名称
- value: name 的别名
initMethod
- 在 bean 实例化时,调用的方法
destroyMethod
- 在析构时,被调用的方法
调用 @Bean 生成的 bean
使用 IoC 容器
- context.getBean("yourBeanName")
自动装配@Autowired
修饰要装配到的变量
- eg: <<AutoWired Example>>
| |
实例
使用@Bean
1 2 3 4 5 6 7 8 9 10 11 12 13 14 15 16 17@Configuration public class AppConfig { // 使用@Bean 注解表明myBean需要交给Spring进行管理 // * 未指定bean 的名称,默认采用的是 "方法名" + "首字母小写"的配置方式 @Bean public MyBean myBean(){ return new MyBean(); } } public class MyBean { public MyBean(){ System.out.println("MyBean Initializing"); } }调用返回的对象
1 2 3 4 5 6 7 8public class SpringBeanApplicationTests { public static void main(String[] args) { ApplicationContext context = new AnnotationConfigApplicationContext(AppConfig.class); // 调用 context.getBean("myBean"); } }
运行
- 直接运行:gradlew bootRun
使用 jar
- gradlew build
- jar -jar build/libs/your_jar.jar
打包成 war
https://www.tutorialspoint.com/spring_boot/spring_boot_tomcat_deployment.htm
- 扩展 SpringBootServletInitializer 类
自动装配 autowiring
https://blog.csdn.net/yy_diego/article/details/88358180
@Autowired
https://www.cnblogs.com/fnlingnzb-learner/p/9723834.html
- 把新建对象赋值到(装配)被注释的变量
- 对于接口 interface 类型,装配 其实现类的对象
- ref: @AutoWired Example
@Repository
https://blog.csdn.net/yy_diego/article/details/88358180
@Repository 是@Component 的派生
- 因此被@Repository 注解的类,可以被@ComponentScan 通过路径扫描到
@Component Vs. @Repository Vs. @Service Vs. @Controller
https://blog.csdn.net/weixin_42476601/article/details/86137375
三层分层架构
@Repository
- 持久层 dao
@Service
- 业务层
@Controller
- 控制层 or Web 层
@Component
- 中立的类
@Autowired Vs. @Resources
- 都用来自动装配
@Autowired
- 按 type 装配
- 属于 Spring 独有
@Resources
- 按 name 装配
- 不属于 Spring 独有
@Qualifier
https://blog.csdn.net/qq_36567005/article/details/80611139
对于@Autowired
当一个接口 Interface 有 多个实现类
- 这时 @Autowired 不能确定使用哪一个
- 因此,@Qualifier 就很必要了, 指明使用哪个实现类
注意
- @Qualifier 设定的值,必须是合格的实现类的设定名称
- eg: 如之前使用 @Service(name="mySetName") 等的设定值
对于@Resources
本身使用的就是,按 name 装配,直接指定 name 即可
- eg: @Resources(name="mySetName")
@Inject
https://blog.csdn.net/zhaoyishi/article/details/83964634
https://www.cnblogs.com/pjfmeng/p/7551340.html
修饰对象
- 构造方法
- 方法
- 属性
- 按类型装配
位置
- javax.inject.Inject
合适类型冲突的解决
使用@Named("yourSetName") 进行区别
- javax.inject.Named
修饰构造方法
作用
- 构造方法的形参,使用 IoC 容器提供
- 可以注释无参构造方法
最多只能有一个构造方法被@Inject 注释
- 因为,JRE 无法决定构造方法注入的优先级
修饰方法
参数类型
- 可以是零个或多个
注意
- 不能使用的情况
- 抽象方法
- 参数类型,不能是自身类型
@Autowired Vs. @Resources Vs. @Inject 对比
@Scope
新生成的 bean, 相对于已经创建的 bean 的 请求可见范围 https://blog.csdn.net/Tracycater/article/details/54019223?utm_medium=distribute.pc_relevant.none-task-blog-BlogCommendFromMachineLearnPai2-2.edu_weight&depth_1-utm_source=distribute.pc_relevant.none-task-blog-BlogCommendFromMachineLearnPai2-2.edu_weight
使用
- @Scope("prototype")
类型
基本作用域
singleton: 单例模式
- 默认值
- 整个 Spring IoC 容器中, 给定 bean 只有一个实例
prototype: 原型模式
- 每次容器通过 getBean() 方法,都会产生一个新的实例
Web 作用域
request
- 每次 http request, 都会产生新的实例
session
- 每次 http session, 都会产生新的实例
globalsession
- 每个全局的 http session, 都会产生新的实例
- 自定义作用域
@Component Vs. @Configuration
https://blog.csdn.net/long476964/article/details/80626930
@Configuration
- Bean 生成方法 只会运行一次,因此,生成的 bean 都是同一个
- 第二次调用 bean 生成方法,实际上进行的是,查询第一次的调用返回结 果
Spring Runners
https://www.tutorialspoint.com/spring_boot/spring_boot_runners.htm
Application Runner
Command Line Runner
配置
全局配置文件, Application Properties 配置 + @ConfigurationProperties 或 @Value
https://www.tutorialspoint.com/spring_boot/spring_boot_application_properties.htm 通过不同的设置方法来间接设置 Application Properties, 进而设置 Spring Application 的属性
间接设置 Application Properties 的不同方法
Command Line Properties
- 命令行参数法
eg:
1java -jar your_demo.jar --server.port=9090
Properties File
配置文件: src/main/resources/application.properties
1 2server.port = 9090 spring.application.name = demoservice
YAML File
配置文件: src/main/resources/application.yml
1 2 3 4 5spring: application: name: demoservice server: port: 9090
外部文件
- 在别的目录下配置好 配置文件 application.properties
- 在命令行设定其路径
| |
@Value 每次使用单个属性
- 提取使用 Application Properties 的值
作用
- 把 application properties 的值赋值给相关变量
用法
1 2 3 4 5 6// * syntax @Value("${property_key_name}") // * Application property: spring.application.name @Value("${spring.application.name}") private String name;默认值形式
1 2 3@Value("${property_key_name:default_value}") @Value("${spring.application.name:demoservice}")
使用多个版本的配置文件, spring boot Active Profile
多个文件
- application.properties
- application-dev.properties
- application-prod.properties
选择使用的 profile, Active Profile
1java -jar your_demo.jar --spring.profiles.active=dev
对于 yaml 文件法,也可以把多个 profile 写在同一个文件中
- 使用 "–" 分割
- 使用 profiles: dev, profiles: prod 设置名称
| |
@ConfigurationProperties 批量注入属性
https://www.bilibili.com/video/BV1Et411Y7tQ?p=10
作用
- 告诉 SpringBoot, 将当前类的所有属性,与 Application Properties
文件中相关配置,进行关联
特点
- 支持松散语法
即,在 Application Properties 中
"-" 分割单词 和 驼峰分割词,被识别成相同的变量
- 不支持 SpEl 语法
- 支持 JSR303 数据校验
eg:
1@Email private String lastName关联对象
- prefix 参数指定
指定关联到 Application Properties 下的哪个对象
1 2 3 4 5 6 7 8@Component @ConfigurationProperties(prefix="person") class Person { private String lastName; private String pets; private String age }application.yaml
1 2 3 4 5 6 7person: lastName: "Jhonson" pets: - dog - cat - bird age: 13
需要的依赖
configuration-preprocessor
| |
其它外部配置文件
@PropertySource 指定配置文件路径
类似前面的@ConfigurationProperties
- 只不过这里需要指定配置文件路径
指定配置文件路径
1 2 3 4 5 6@PropertySource(value = "classpath:persion.properties") @Component class Person { private String lastName; }
@ImportSource 用来指定传统的 Spring xml 配置文件位置
| |
在测试中判断生效
| |
xml 配置
1 2 3 4 5 6 7<?xml version="1.0" encoding="UTF‐8"?> <beans xmlns="http://www.springframework.org/schema/beans" xmlns:xsi="http://www.w3.org/2001/XMLSchema‐instance" xsi:schemaLocation="http://www.springframework.org/schema/beans http://www.springframework.org/schema/beans/spring‐beans.xsd"> <bean id="helloService" class="com.atguigu.springboot.service.HelloService"></bean> </beans>使用原因
- Spring Boot 本身并不能自动寻找 xml 配置文件路径
- 需要手动指定
注意
- 这不是 SpringBoot 推荐的方法
- 推荐的方法
- @Configuration 标注注释类
@Bean 标注的方法
- 返回值 –> 将要放入容器中的类
配置类
| |
@Configuration
- 标注配置类
@Bean
- 标注配置类中的方法
地位
- 具体给 IoC 容器添加组件的接口
注意
- 组件定位方式
- 即,怎么在 IoC 容器中找到这个放进去的类
通过方法名,进行定位
- eg: 是上面的 "helloService01", 而不是 "HelloService"
配置文件占位符
使用位置
在配置文件中
- Application Properties
- 外部配置文件
- xml 配置文件
例子
application.properties
1 2person.lastName = 张三${random.uuid} person.dogName = ${person.lastName}的狗
语法
${random.uuid}
- 调用预定义函数
随机数
1 2${random.uuid}, ${random.int}, ${random.long} ${random.int(10)}, ${random.int[1, 10]}- random.uuid
- random.int
- random.long
random.
${person.lastName}
- 引用其它变量
${person.lastName:Lucy}
- 引用不存在
- 设置默认值
@Value
https://www.cnblogs.com/wangbin2188/p/9014837.html
特点
- 支持 SpEl 语法
不支持 松散命名法
- 即,驼峰 和 "-"分割 标识符两种命名风格
给变量赋值
普通字符串
- @Value("your_string")
系统属性
- @Value("#{systemProperties['os.name']}")
java 表达式的值
- @Value("#{T(java.lang.Math).random()*100.0}")
| |
Spring Boot 处理异常
https://www.tutorialspoint.com/spring_boot/spring_boot_exception_handling.htm
Spring 全局异常类的定义 @ControllerAdvice
用途
用来包含,异常处理方法
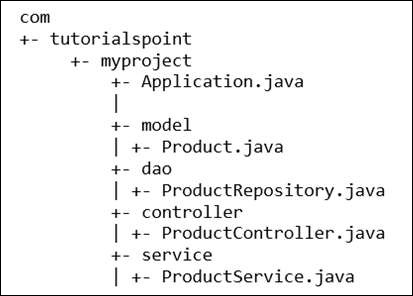
1 2 3 4 5 6 7@ControllerAdvice public class ProductExceptionController { @ExceptionHandler(value = ProductNotfoundException.class) public ResponseEntity<Object> exception(ProductNotfoundException exception) { return new ResponseEntity<>("Product not found", HttpStatus.NOT_FOUND); } }
Spring 异常处理方法 @ExceptionHandler
可以被抛出的异常类
普通扩展了 RuntimeException 的异常类
1 2 3 4package com.tutorialspoint.demo.exception; public class ProductNotfoundException extends RuntimeException { private static final long serialVersionUID = 1L; }
总体流程
自定义异常类
- RuntimeException 扩展,定义一个普通 runtime 异常类
@ControllerAdvice
- 声明一个 Spring 异常处理类
@ExceptionHandler
- 在异常处理类中,创建“自定义异常类”的异常处理函数
使用自定义异常类
- 在需要的地方,直接使用 throw 抛出即可
Interceptor 拦截器
Spring 中 https://www.cnblogs.com/black-spike/p/7813238.html
spring boot 中 https://www.tutorialspoint.com/spring_boot/spring_boot_interceptor.htm
作用位置
- 在 client 和 server 之间
request
- 被接收前
response
- 被发送离开前
如何实现
实现 HandlerIntercepter 接口
- 直接实现
- 继承 HanderIntercepterAdapter 类(已经实现 HandlerIntercepter 接 口)
- 实现 WebRequestInterceptor 类
- 直接实现
继承已经实现的类
- 使用@Component 注解
实现三个方法
- preHandler()
作用位置
request 发给 Controler 之前
- postHandler()
作用位置
- response 发给 client 之前
- View 视图 被渲染之前
注:
View 渲染发生在 Controller 生成 Response 之后
- afterComplete()
作用位置
View 被渲染之后
- 总体流程
- request –> preHandler –> Controller –> postHandler –> View 渲染 —> afterComplete
如何注册(被 Spring Boot 扫描到)<<Register Interceptor>>
- 把自定义 HandlerInterceptor, 注册(register)到 InterceptorRegistry
方法
声明一个继承了 WebMvcConfigurerApp 的类
- 作用:用来把自定义 Interceptor 自定义装配到它的上面
| |
Servlet Filter(Spring Boot)
https://www.tutorialspoint.com/spring_boot/spring_boot_servlet_filter.htm
作用位置
- request 传递给 Controller 之前
- response 传递给 client 之前
如何实现
- 实现 javax.servlet.Filter 接口
- 使用@Component 注解修饰
Rest Template 模拟客户端
https://www.tutorialspoint.com/spring_boot/spring_boot_rest_template.htm
作用
- 用来发送请求的类
方法
exchange
- 作用
通用请求方法,通过指定请求方法 HttpMethod 实现
- 返回值:ResponseEntity
- 传输数据
- 指定 url 中的参数
- 指定 HttpEntity 的 Body
相关类
HttpEntity
response 和 request 的基类
- 它们的共同特性
body
- 需要指定 数据类型
headers
MultiValueMap<String, String> 类型
子类
- ResponseEntity
- RequestEntity
HttpHeaders
方法
- setAccept(array_list)
设置允许接收的数据类型
1headers.setAccept(Arrays.asList(MediaType.APPLICATION_JSON));- add("key_name", "value")
添加 键值对 数据
1headers.add("Content-Disposition", String.format("attachment; filename=\"%s\"", file.getName()));
文件传输
https://www.tutorialspoint.com/spring_boot/spring_boot_file_handling.htm
文件上传 uploading
这里是 client 的上传
操作流程
- 从 file 中 读取,写入本地
- 使用辅助类 MultipartFile
- 获取文件名:file.getOriginalFilename()
- 读取字节流:file.getBytes()
@RestMapping 配置
consumes 属性
- 在 RestController 中,指定给定 url 可以接收的 media types 媒体数据
类型
| |
文件下载 downloading
这里是 client 的下载
操作流程
- 从 localFile 中 读取,传给 client
- 把 文件读取流 赋值给 body
注意
- 还需要设置 Reponse 头文件
ResponseEntity
创建 函数链
| |
@Service 组件
用途
- 用来标注业务逻辑类,不同于 RestController
注意
- 用来标注类,不是接口
使用
- 在 RestController 中,被调用
简化 RestController 复杂度
These class files are used to write business logic in a different layer, separated from @RestController class file.
Thymeleaf Template
https://www.tutorialspoint.com/spring_boot/spring_boot_thymeleaf.htm
- 用来制作 html5, xml, xhtml 等
特点
使用@Controller 注解
- @RequestMapping 对应方法,返回值 自动被转换成模板文件
配置项目文件
- resources
static
- css 文件夹
templates
存放模板
gradle 或 maven 添加 Thymeleaf 依赖
- spring-boot-starter-thymeleaf
Cross-Origin Resource Sharing (CORS)
https://www.cnblogs.com/demingblog/p/8393511.html
名称
- Cross-Origin: 跨源 或者 跨域
被限制功能:
- JS 跨域调用
拦截者
- 浏览器
跨源 Cross-Origin
- 跨域名:即两个不同的域名,如:www.baidu.com 和 wwww.ifeng.com
- 跨端口号:域名相同,端口号不同,如:localhost:80 与 localhost:8080
- 跨协议
被限制的 Js 请求
- ajax, XMLHttpRequest 请求
- js fetch API https://www.jianshu.com/p/f817490796d3
- web 字体 @font-face
- WebGL textures
- drawImage –> 绘制 canvas
- 样式表(CSSOM)
注意
直接请求数据,不被限制
- 如:直接请求加载 别的网站的图片
破解跨源
设置 CORS 头信息
把 被限制的 网站,添加到 请求 headers
1Access-Control-Allow-Origin: http://www.myapp.com
使用 jsonp
使用 jquery
Spring Boot 对 CORS 跨源 问题的支持
假设目标
- 允许第三方网站,跨源访问我们的 Restful web services
需要解决的问题
- RESTful web services 需要支持 跨源
- Restful web 需要 允许
局部实现跨源:@CrossOrigin 注解
origins 属性
- 允许跨源的网站
作用对象
和 @RestMapping 一起使用,作用于方法
1 2 3 4 5 6@RequestMapping(value = "/products") @CrossOrigin(origins = "http://localhost:8080") public ResponseEntity<Object> getProduct() { return null; }
全局实现跨源
使用 @Configuration + @Bean 实现配置
- 配置类:WebMvcConfigurer
1 2 3 4 5 6 7 8 9@Bean public WebMvcConfigurer corsConfigurer() { return new WebMvcConfigurerAdapter() { @Override public void addCorsMappings(CorsRegistry registry) { registry.addMapping("/products").allowedOrigins("http://localhost:9000"); } }; }
Internationalization 国际化
配置 地区 locale
@Bean 配置
配置类: LocaleResolver
1 2 3 4 5 6@Bean public LocaleResolver localeResolver() { SessionLocaleResolver sessionLocaleResolver = new SessionLocaleResolver(); sessionLocaleResolver.setDefaultLocale(Locale.US); return sessionLocaleResolver; }
根据 Request 改变 locale, 使用 Interceptor
@Bean 配置
- 配置类:LocaleChangeInterceptor
Interceptor 注册
参考一般 Interceptor 的注册,ref: Register Interceptor
1 2 3 4@Override public void addInterceptors(InterceptorRegistry registry) { registry.addInterceptor(localeChangeInterceptor()); }
message.properties 配置文件
用来配置不同的 locale 常用词语或句子
1welcome.text = Hi Welcome to Everyone使用
配合 Thymeleaf template 使用
1 2 3<body> <h1 th:text = "#{welcome.text}"></h1> </body>
指定不同 locale
通过不同文件名实现
- message.properties 默认名
- message_fr.properties 法语
Scheduling 定时任务
相关注解
@EnableScheduling
与 @SpringBootApplication 一起使用,启动定时任务
@Component + @Scheduled
制作定时任务组件
1 2 3 4 5 6 7 8 9 10 11@Component public class Scheduler { @Scheduled(fixedRate = 1000) public void fixedRateSch() { SimpleDateFormat sdf = new SimpleDateFormat("yyyy-MM-dd HH:mm:ss.SSS"); Date now = new Date(); String strDate = sdf.format(now); System.out.println("Fixed Rate scheduler:: " + strDate); } }@Scheduled 属性 https://www.jianshu.com/p/1defb0f22ed1
- cron
cron 格式 https://docs.oracle.com/cd/E12058_01/doc/doc.1014/e12030/cron_expressions.htm
- [秒] [分] [小时] [日] [月] [周] [年]
注
年:非必须,可以省略
- zone
指定时区
- fixedDelay
- 上一次完成后,多久再执行
单位:毫秒
- fixedDelayString
- 使用字符串配置
可以使用 application.properties
1 2 3 4@Scheduled(fixedDelayString = "${time.fixedDelay}") void testFixedDelayString() { System.out.println("Execute at " + System.currentTimeMillis()); }- fixedRate
- 与 fixedDelay 不同
在上一次任务开始多久后执行
不管上一次任务,是否完成
- fixedRateString
application.properties
- initDelay
程序启动多久后,开始任务
1@Scheduled(initialDelay=1000, fixedRate=5000) //第一次延迟1秒后执行,之后按fixedRate的规则每5秒执行一次- initDelayString
- application.properties
使用 Https
- 获取 ssl certificates 证书
- 启用 Https 和 443 端口
制作 ssl 证书
使用 keytool 命令(jdk 提供)
1keytool -genkey -alias tomcat -storetype PKCS12 -keyalg RSA -keysize 2048 -keystore keystore.p12 -validity 3650- -keystore: 指定产生文件的名字
启用 Https, 配置 application.properties
| |
| |
Eureka 架构
https://blog.csdn.net/qq_41234832/article/details/84864551
创建 Eureka Server, 使用@EnableEurekaServer
https://www.tutorialspoint.com/spring_boot/spring_boot_eureka_server.htm
- 与 @SpringBootApplication 一起使用
配置 Application properties
| |
https://www.tutorialspoint.com/spring_boot/spring_boot_service_registration_with_eureka.htm
生产者,注册 RestController 到 Eureka, @EnableEurekaClient
https://www.tutorialspoint.com/spring_boot/spring_boot_service_registration_with_eureka.htm
- Eureka Client
- 即,在 Rest Service 网站,开启 Eureka Client 功能
- 与 @SpringBootApplication 一起使用
配置 application properties
- 指定要注册到的 Eureka Server
| |
消费者,Rest 网站的使用者, 使用 Eureka Server, @EnableEurekaClient
- Eureka Client
- 与 @SpringBootApplication 一起使用
配置 application properties
- 指定要注册到的 Eureka Server
| |
zuul, @EnableZuulProxy
https://www.cnblogs.com/lexiaofei/p/7080257.html 网关工具,一系列 filters
Config Server
配置管理工具 https://blog.csdn.net/pengjunlee/article/details/88061736
- @EnableConfigServer –> config server
- @RefreshScope –> config client
Actuator
https://www.jianshu.com/p/d5943e303a1f “单个网站” 的健康检查、审计、统计和监控
Admin Server
在 Acuator 的基础上,进行了优化
Swagger2
用来生成 REST API 文档
Docker and SpringBoot
https://www.tutorialspoint.com/spring_boot/spring_boot_creating_docker_image.htm
Docker file
- 可以放置在 src/main/docker(具体位置,可以在 maven 或 gradle 中指定)
Sleuth 和 ZipKin Server
- 对 log 进行 优化
Sleuth
- 只需要 在 maven 中导入依赖即可, 不用修改程序本身
Spring Boot 单元测试
相关注解
| |
@Conditional
https://www.jianshu.com/p/128bd6a5244a https://segmentfault.com/a/1190000018777937
作用:用于条件配置
- 决定哪些组件能够生效
作用对象
- @Component
- @Configuration
- @Bean
注
- 作用在上面三种注解修饰的目标上
使用
与 Condition 类 一起作用
- Condition 类的派生
- @Override 重写 其中的 matches() 方法
- 作用:设置匹配条件
IoC 容器, ApplicationContext
判断是否包含某个类
containsBean(String name) 方法
1boolean flag = ioc.containsBean("yoru_class_name")
文章作者
上次更新 2022-03-07 (de34a70)